The following applies on Mac, but should work on Windows as well with proper Windows command accordingly.
More documentation can be found here.
Prerequisites
Install Homebrew
/bin/bash -c "$(curl -fsSL https://raw.githubusercontent.com/Homebrew/install/HEAD/install.sh)"
Install Maven
For now, only Maven 3.9.x is supported.
brew install maven
Install and configure OpenJDK@21
- Install OpenJDK
brew install openjdk@21
- Add
JAVA_HOMEto.zshrc
echo 'export JAVA_HOME=$(/usr/libexec/java_home)' >> ~/.zshrc
- Apply changes
source .zshrc
Download and install NodeJS
For now, only NodeJS 14.x is supported. 16.x is working well. But not higher.
Create a Keystore for vRO package signing
- Create a directory for Keystore
mkdir archetype.keystore-2.0.0
cd archetype.keystore-2.0.0
- Generate a new keystore. Replace with your values.
Java keystore, used for signing packages at build time. All API calls from the toolchain (i.e., the client) verify the SSL certificate returned by vRO/vRA (i.e., the server). If you are using self-signed or third-party signed certificates, you may need to add those certificates or their CA certificates to the default JAVA keystore, i.e., JAVA_HOME/lib/security/cacerts. This is the recommended approach.keytool -keystore archetype.keystore -genkey -alias dunesrsa_alias -storepass 'XXXXXX' -keyalg RSA
What is your first and last name?
[Unknown]: John Doe
What is the name of your organizational unit?
[Unknown]: XX
What is the name of your organization?
[Unknown]: XX
What is the name of your City or Locality?
[Unknown]: XX
What is the name of your State or Province?
[Unknown]: XX
What is the two-letter country code for this unit?
[Unknown]: XX
Is CN=John Doe, OU=XX, O=XX, L=XX, ST=XX, C=XX correct?
[no]: yes
Enter key password for <dunesrsa_alias>
(RETURN if same as keystore password):
Warning:
The JKS keystore uses a proprietary format. It is recommended to migrate to PKCS12 which is an industry standard format using "keytool -importkeystore -srckeystore archetype.keystore -destkeystore archetype.keystore -deststoretype pkcs12".
- Generate a key to sign the toolchain. Replace the values with yours.
It's essential to note that the emailAddress should NOT be empty. Otherwise, the vRO import will break with a '400 OK' errorkeytool -genkey -keyalg RSA -keysize 2048 -alias dunesrsa_alias -keystore archetype.keystore -storepass 'XXXXX' -validity 3650 -dname "CN=Project,OU=Department,O=Company,L=City,ST=State,C=XX,emailAddress=XXX"
Enter key password for <dunesrsa_alias>
(RETURN if same as keystore password):
Warning:
The JKS keystore uses a proprietary format. It is recommended to migrate to PKCS12 which is an industry standard format using "keytool -importkeystore -srckeystore archetype.keystore -destkeystore archetype.keystore -deststoretype pkcs12".
Generate a Private Key and Certificate for vRO Package Signing
cd /path/archetype.keystore-2.0.0
Generate a private key and export it. Replace with your values.
openssl genpkey -out private_key.pem -algorithm RSA
openssl req -new -key private_key.pem -out csr.csr
You are about to be asked to enter information that will be incorporated
into your certificate request.
What you are about to enter is what is called a Distinguished Name or a DN.
There are quite a few fields but you can leave some blank
For some fields there will be a default value,
If you enter '.', the field will be left blank.
-----
Country Name (2 letter code) []:XX
State or Province Name (full name) []:XX
Locality Name (eg, city) []:XX
Organization Name (eg, company) []:XX
Organizational Unit Name (eg, section) []:XX
Common Name (eg, fully qualified host name) []:XX
Email Address []:

Please enter the following 'extra' attributes
to be sent with your certificate request
A challenge password []:
openssl req -x509 -days 999 -key private_key.pem -in csr.csr -out cert.pem
Make sure that archetype.keystore-2.0.0 directory contains those three files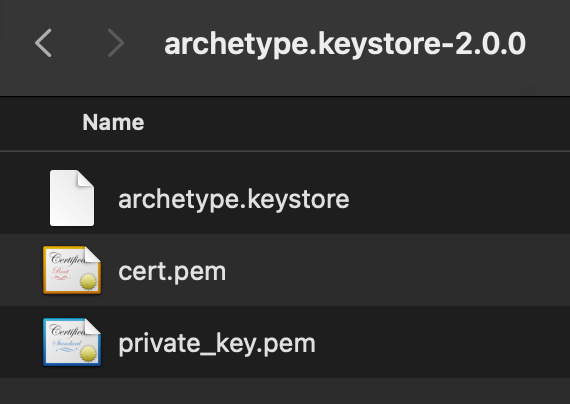
Create an archetype.keystore-2.0.0.zip
cd ..
zip archetype.keystore-2.0.0.zip -r archetype.keystore-2.0.0
Create .m2 and keystore directory
mkdir ~/.m2
cd .m2
mkdir keystore
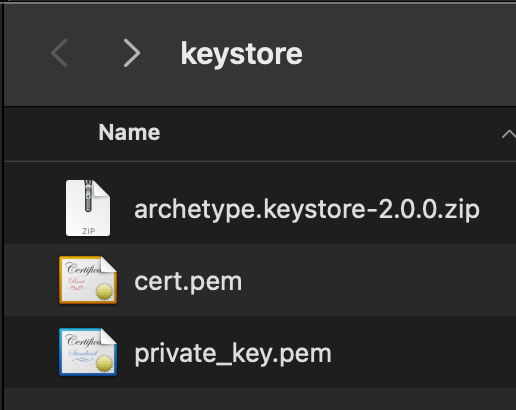
Copy archetype.keystore-2.0.0.zip to .m2 directory
cp /path/archetype.keystore-2.0.0.zip ~/.m2/keystore/
Now, the ~/.m2/keystore/ should contain the following:
Create settings-security.xml
All the encrypted passwords will be used later in the settings.xml. Maven password encryption details can be found here.cd ~/.m2
touch settings-security.xml
Generate Maven master password
mvn --encrypt-master-password
Master password: XXX
{5bTlAWaH...}
Save it into settings-security.xml.
vi settings-security.xml
Copy password into the settings-security.xml and save.
<settingsSecurity>
    <master>{5bTlAWaH...}</master>
</settingsSecurity>
Encrypt credentials
Encrypt user's password and keystore's password.
Using this method, Maven will handle the escape of all special characters. There is no longer a need to provide the password as part of the command.
Example:
mvn --encrypt-password
Password:
{5bTlAWaH...}
Create settings.xml
vi settings.xml
Copy the XML body below into settings.xml ans save the file.
<?xml version="1.0" encoding="UTF-8"?>
<settings
xsi:schemaLocation="http://maven.apache.org/SETTINGS/1.1.0 http://maven.apache.org/xsd/settings-1.1.0.xsd"
xmlns="http://maven.apache.org/SETTINGS/1.1.0"
xmlns:xsi="http://www.w3.org/2001/XMLSchema-instance">
<servers>
<server>
<username>[email protected]</username>
<password>{5bTlAWaH...}</password>
<id>vra01</id>
</server>
<server>
<username>[email protected]</username>
<password>{5bTlAWaH...}</password>
<id>vro01</id>
</server>
</servers>
<profiles>
<profile>
<id>packaging</id>
<properties>
<keystorePassword>{ftykftyid}</keystorePassword>
<keystoreLocation>/Users/user1/.m2/keystore/archetype.keystore-2.0.0.zip</keystoreLocation>
<vroPrivateKeyPem>/Users/user1/.m2/keystore/private_key.pem</vroPrivateKeyPem>
<vroCertificatePem>/Users/user1/.m2/keystore/cert.pem</vroCertificatePem>
<vroKeyPass>PASSWORD</vroKeyPass>
</properties>
</profile>
<profile>
<id>bundle</id>
<properties>
<assembly.skipAssembly>false</assembly.skipAssembly>
</properties>
</profile>
<profile>
<id>artifactory</id>
<repositories>
<repository>
<snapshots>
<enabled>false</enabled>
</snapshots>
<id>central</id>
<name>central</name>
<url>https://repo1.maven.org/maven2/</url>
</repository>
<repository>
<snapshots>
<enabled>true</enabled>
</snapshots>
<id>central-snapshots</id>
<name>central-snapshots</name>
<url>https://repo1.maven.org/maven2/</url>
</repository>
</repositories>
<pluginRepositories>
<pluginRepository>
<snapshots>
<enabled>false</enabled>
</snapshots>
<id>central</id>
<name>central</name>
<url>https://repo1.maven.org/maven2/</url>
</pluginRepository>
<pluginRepository>
<snapshots>
<enabled>true</enabled>
</snapshots>
<id>central-snapshots</id>
<name>central-snapshots</name>
<url>https://repo1.maven.org/maven2/</url>
</pluginRepository>
</pluginRepositories>
<properties>
<releaseRepositoryUrl>https://repo1.maven.org/maven2/</releaseRepositoryUrl>
<snapshotRepositoryUrl>https://repo1.maven.org/maven2/</snapshotRepositoryUrl>
</properties>
</profile>
<profile>
<!--Environment
identifier. Multiple environments are allowed by configuring multiple profiles -->
<id>vro01</id>
<properties>
<vrealize.ssl.ignore.hostname>false</vrealize.ssl.ignore.hostname>
<vrealize.ssl.ignore.certificate>false</vrealize.ssl.ignore.certificate>
<!--vRO Connection-->
<vro.host>{vro_host}</vro.host>
<vro.port>{vro_port}</vro.port>
<vro.serverId>vro01</vro.serverId>
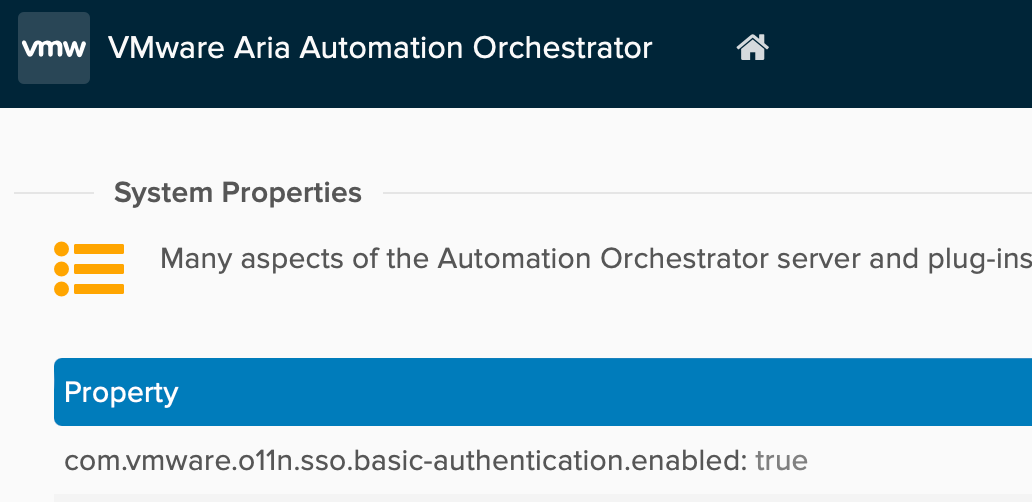
<vro.auth>{basic}</vro.auth> <!-- If "basic" is selected here, ensure com.vmware.o11n.sso.basic-authentication.enabled=true System Property is set in vRO -->
<vro.authHost>{auth_host}</vro.authHost> <!-- Required for external vRO instances when vra auth is used -->
<vro.authPort>{auth_port}</vro.authPort> <!-- Required for external vRO instances when vra auth is used -->
<vro.refresh.token>{refresh_token}</vro.refresh.token> <!-- login with token when vra auth is used -->
<vro.proxy>http://proxy.host:80</vro.proxy>
<vro.tenant>{vro_tenant}</vro.tenant>
</properties>
</profile>
<profile>
<!--Environment
identifier. Multiple environments are allowed by configuring multiple profiles -->
<id>vra01</id>
<properties>
<vrealize.ssl.ignore.hostname>false</vrealize.ssl.ignore.hostname>
<vrealize.ssl.ignore.certificate>false</vrealize.ssl.ignore.certificate>
<!--vRA Connection-->
<vra.host>{vra_host}</vra.host>
<vra.port>{vra_port}</vra.port>
<vra.tenant>{vra_tenant}</vra.tenant>
<vra.serverId>vra01</vra.serverId>
</properties>
</profile>
</profiles>
<activeProfiles>
<activeProfile>artifactory</activeProfile>
<activeProfile>packaging</activeProfile>
</activeProfiles>
</settings>
If I encrypt thevroKeyPasswithmvn --encrypt-passwordthe project building will fail in the later stage. I didn't find a way to make it work. ThevroKeyPassshould remain a clear-text password.
vrealize.ssl.ignorecan be changed fromfalsetotrueif needed. Of course, it is not recommended in the production environmentvroKeyPassis a password used when we created a Private KeykeystorePasswordis a password used when we created a KeystorekeystoreLocationchange to your locationvroPrivateKeyPemchange to your locationvroCertificatePemchange to your location<servers><server><username>change to your username<servers><server><password>change to your password<servers><server><id>change to your ID
The minimum required settings for vRO
<vro.host>VRO_FQDN</vro.host>
<vro.port>443</vro.port>
<vro.serverId>vro01</vro.serverId>
<vro.auth>basic</vro.auth>
The minimum required settings for vRA
<vro.host>VRA_FQDN</vro.host>
<vro.port>443</vro.port>
<vro.serverId>vra01</vro.serverId>
<vro.auth>basic</vro.auth>
Here's how the final setup will look if one (or both) of these minimum settings are applied:
<?xml version="1.0" encoding="UTF-8"?>
<settings
    xsi:schemaLocation="http://maven.apache.org/SETTINGS/1.1.0 http://maven.apache.org/xsd/settings-1.1.0.xsd"
    xmlns="http://maven.apache.org/SETTINGS/1.1.0"
    xmlns:xsi="http://www.w3.org/2001/XMLSchema-instance">
    <servers>
        <server>
            <username>[email protected]</username>
            <password>{5bTlAWaH...}</password>
            <id>vra01</id>
        </server>
        <server>
            <username>[email protected]</username>
            <password>{5bTlAWaH...}</password>
            <id>vro01</id>
        </server>
    </servers>
    <profiles>
        <profile>
            <id>packaging</id>
            <properties>
                <keystorePassword>{ftykftyid}</keystorePassword>
                <keystoreLocation>/Users/user1/.m2/keystore/archetype.keystore-2.0.0.zip</keystoreLocation>
                <vroPrivateKeyPem>/Users/user1/.m2/keystore/private_key.pem</vroPrivateKeyPem>
                <vroCertificatePem>/Users/user1/.m2/keystore/cert.pem</vroCertificatePem>
                <vroKeyPass>PASSWORD</vroKeyPass>
            </properties>
        </profile>
        <profile>
            <id>bundle</id>
            <properties>
                <assembly.skipAssembly>false</assembly.skipAssembly>
            </properties>
        </profile>
        <profile>
            <id>artifactory</id>
            <repositories>
                <repository>
                    <snapshots>
                        <enabled>false</enabled>
                    </snapshots>
                    <id>central</id>
                    <name>central</name>
                    <url>https://repo1.maven.org/maven2/</url>
                </repository>
                <repository>
                    <snapshots>
                        <enabled>true</enabled>
                    </snapshots>
                    <id>central-snapshots</id>
                    <name>central-snapshots</name>
                    <url>https://repo1.maven.org/maven2/</url>
                </repository>
            </repositories>
            <pluginRepositories>
                <pluginRepository>
                    <snapshots>
                        <enabled>false</enabled>
                    </snapshots>
                    <id>central</id>
                    <name>central</name>
                    <url>https://repo1.maven.org/maven2/</url>
                </pluginRepository>
                <pluginRepository>
                    <snapshots>
                        <enabled>true</enabled>
                    </snapshots>
                    <id>central-snapshots</id>
                    <name>central-snapshots</name>
                    <url>https://repo1.maven.org/maven2/</url>
                </pluginRepository>
            </pluginRepositories>
            <properties>
                <releaseRepositoryUrl>https://repo1.maven.org/maven2/</releaseRepositoryUrl>
                <snapshotRepositoryUrl>https://repo1.maven.org/maven2/</snapshotRepositoryUrl>
            </properties>
        </profile>
        <profile>
            <!--Environment
            identifier. Multiple environments are allowed by configuring multiple profiles -->
            <id>vro01</id>
            <properties>
                <vrealize.ssl.ignore.hostname>false</vrealize.ssl.ignore.hostname>
                <vrealize.ssl.ignore.certificate>false</vrealize.ssl.ignore.certificate>
                <!--vRO Connection-->
                <vro.host>VRO_FQDN</vro.host>
                <vro.port>443</vro.port>
                <vro.serverId>vro01</vro.serverId>
                <vro.auth>basic</vro.auth>
            </properties>
        </profile>
        <profile>
            <!--Environment
            identifier. Multiple environments are allowed by configuring multiple profiles -->
            <id>vra01</id>
            <properties>
                <vrealize.ssl.ignore.hostname>false</vrealize.ssl.ignore.hostname>
                <vrealize.ssl.ignore.certificate>false</vrealize.ssl.ignore.certificate>
                <!--vRA Connection-->
                <vro.host>VRA_FQDN</vro.host>
                <vro.port>443</vro.port>
                <vro.serverId>vra01</vro.serverId>
                <vro.auth>basic</vro.auth>
            </properties>
        </profile>
    </profiles>
    <activeProfiles>
        <activeProfile>artifactory</activeProfile>
        <activeProfile>packaging</activeProfile>
    </activeProfiles>
</settings>
Now, the .m2 directory should include the following:
Permissions Size   User  Date Modified Name
drwxr-xr-x@    -   user1 27 Mar 20:07  keystore
.rw-r--r--@  105   user1 27 Mar 21:07  settings-security.xml
.rw-r--r--@  6.1k  user1 27 Mar 21:07  settings.xml
Check of Building Tools dependencies
To check if the dependencies are met, run:
curl -o- https://raw.githubusercontent.com/vmware/build-tools-for-vmware-aria/main/health.sh | bashBuild
Clone the repo and run the following:
cd /path/build-tools-for-vmware-aria-2.37.0

mvn clean install -f common/keystore-example/pom.xml
mvn clean install -f maven/npmlib/pom.xml
mvn clean install -f pom.xml
mvn clean install -f maven/base-package/pom.xml
mvn clean install -f packages/pom.xml
mvn clean install -f maven/typescript-project-all/pom.xml
mvn clean install -f maven/repository/pom.xml
All the mvn commands should be completed successfully. This will confirm that NodeJS is installed correctly. If one of the steps will fail, check that the installed version of Node is 22.x.
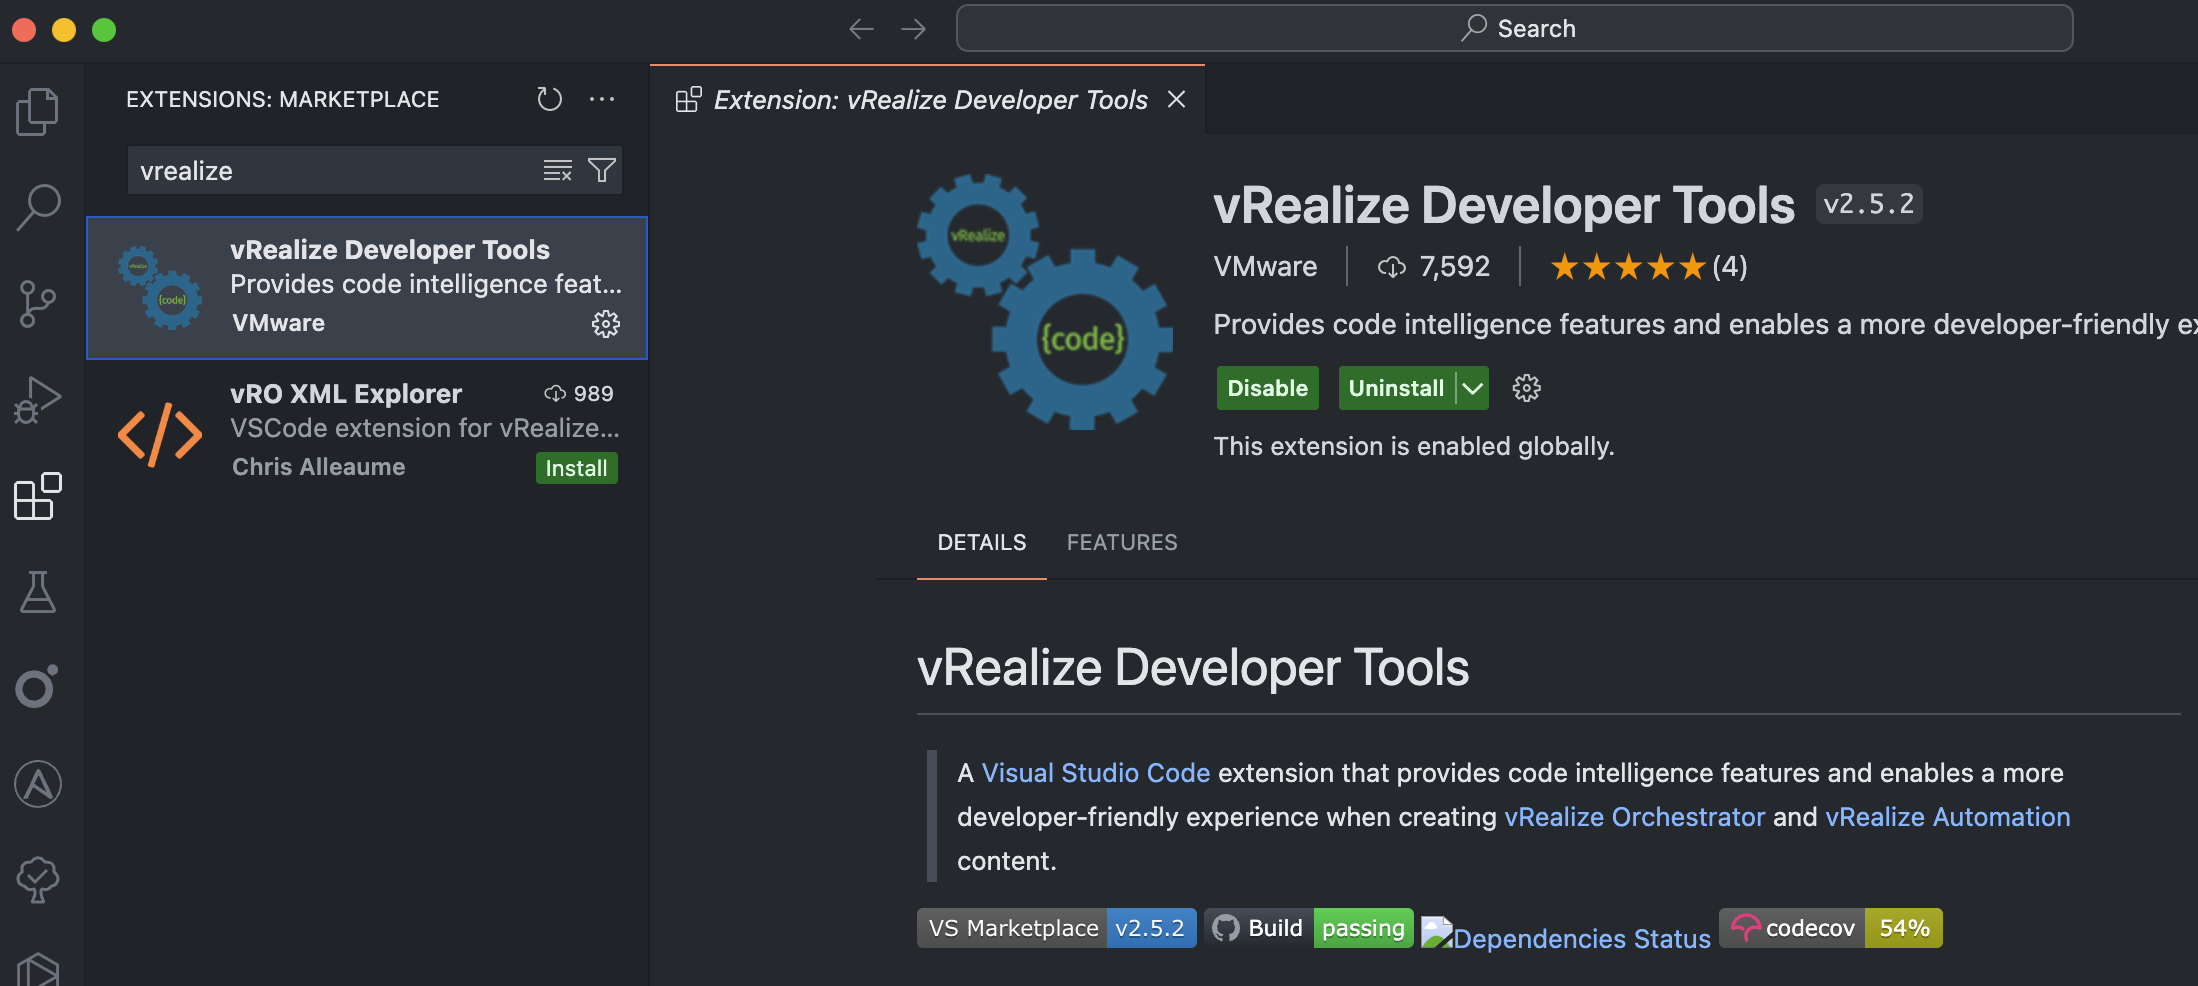
Install vRealize Developer Tools
Follow the instructions provided in the repository. The simplest way is to install the extension in the VSCode. Just go to the Extensions Marketplace and install it.
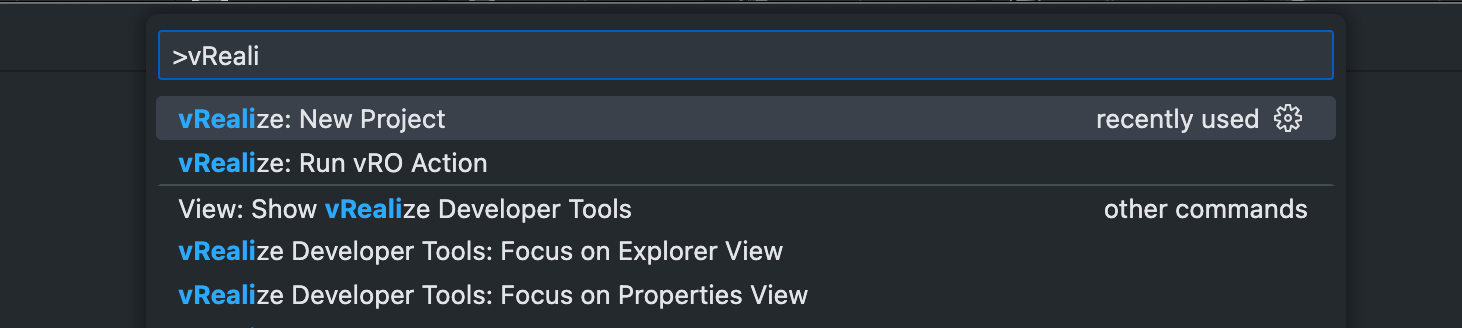
Create a new project in VSCode
Open VSCode, go to Command Palette (CMD + SHIFT + P) and start typing vRealize. Select vRealize: New Project.
Select the type of the project. Let's create a vRO TypeScript-based Project.
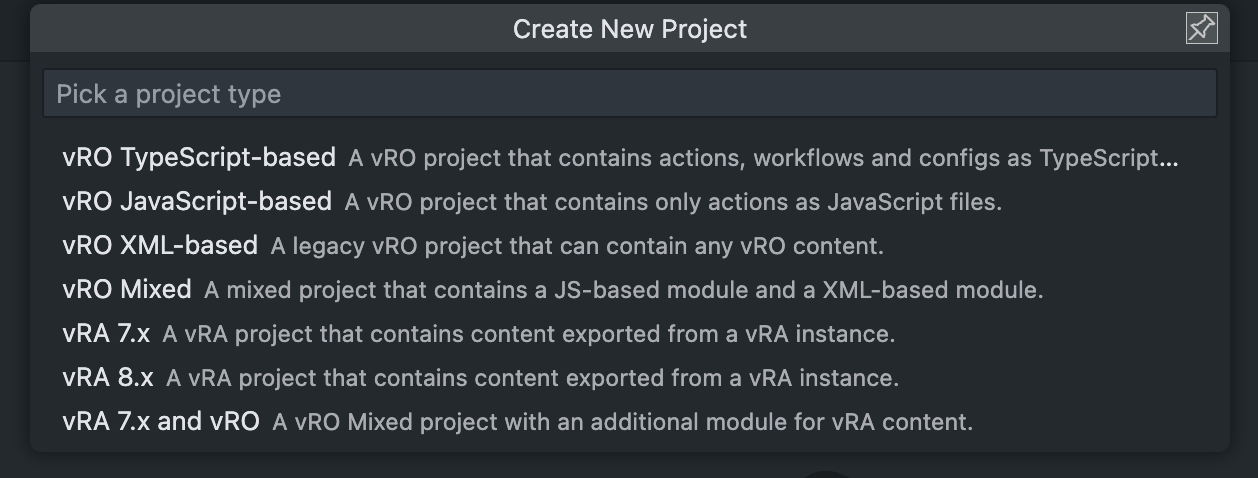
Provide a Project ID.

Provide a Project Name.

Save the project in some directory.
If the error occurs, it may happen because of the default version DarchetypeVersion=2.12.5. The quick solution will be to change the default version in the vRealize Developer Tool setting in VSCode below to any relevant version that should be used.
When everything was done properly, we should see the following in the VSCode
Optional: Configure vRO to support Basic Authentication
If Basic authentication is chosen, follow this procedure. This is how it should look like at the end.
UPDATE 1: Windows installation
Thanks to Mohammad Makeen AlDamouni for providing these tips.
Windows-based installation requires a few additional adjustments:
Make sure both Python and OpenSSL are added to the environment variables.
- Install OpenSSL (version: OpenSSL 3.1.3 19 Sep 2023 (Library: OpenSSL 3.1.3 19 Sep 2023))
- Install Python (version: Python 3.8.0) — pip: 19.2.3
The steps below are similar to those mentioned above for the Mac and can be referenced.
- Creation of the Keystore can be done using the KeyStore Explorer.
- Extract the private key from the keystore.
- Generate the certificate.
- Confirm that both the generated previously certificate and private key are valid.
Next step
In the next post, we'll see how to push the code to the vRO with some cool tricks.
I also want to hear from you about how I can improve my topics! Please leave a comment with the following:
- Topics you're interested in for future editions
- Your favorite part or take away from this one
I'll do my best to read and respond to every single comment!
